Monday, 25 May 2009

daring bakers challenge: rhubarb pecan streusel strudel

Mmmmm hmmmm I love me some strudel, oh yes indeedy.... but boy oh boy is that strudel dough a puzzler. The recipe is very simple, and the instructions easy enough, but to achieve a perfectly stretched, tissue thin dough is tricker than Mr Trick and his tricky box of super tricky tricks! Going into the challenge with my usual gusto I did find myself pulled up rather short once it came to the dough stretchy part, but enough of my dough-woe... The May Daring Bakers’ challenge was hosted by Linda of make life sweeter! and Courtney of Coco Cooks. They chose Apple Strudel from the recipe book Kaffeehaus: Exquisite Desserts from the Classic Cafés of Vienna, Budapest and Prague by Rick Rodgers... And here is said recipe; first up the dough... Strudel dough from “Kaffeehaus – Exquisite Desserts from the Classic Cafés of Vienna, Budapest and Prague” by Rick Rodgers

1 1/3 cups (200 g) unbleached flour 1/8 teaspoon salt 7 tablespoons (105 ml) water, plus more if needed 2 tablespoons (30 ml) vegetable oil, plus additional for coating the dough 1/2 teaspoon cider vinegar

1. Combine the flour and salt in a stand-mixer fitted with the paddle attachment. Mix the water, oil and vinegar in a measuring cup. Add the water/oil mixture to the flour with the mixer on low speed. You will get a soft dough. Make sure it is not too dry, add a little more water if necessary. Take the dough out of the mixer. Change to the dough hook. Put the dough ball back in the mixer. Let the dough knead on medium until you get a soft dough ball with a somewhat rough surface.

2. Take the dough out of the mixer and continue kneading by hand on an unfloured work surface. Knead for about 2 minutes. Pick up the dough and throw it down hard onto your working surface occasionally. Shape the dough into a ball and transfer it to a plate. Oil the top of the dough ball lightly. Cover the ball tightly with plastic wrap. Allow to stand for 30-90 minutes (longer is better).

3. It would be best if you have a work area that you can walk around on all sides like a 36 inch (90 cm) round table or a work surface of 23 x 38 inches (60 x 100 cm). Cover your working area with table cloth, dust it with flour and rub it into the fabric. Put your dough ball in the middle and roll it out as much as you can. Pick the dough up by holding it by an edge. This way the weight of the dough and gravity can help stretching it as it hangs. Using the back of your hands to gently stretch and pull the dough. You can use your forearms to support it.

4. The dough will become too large to hold. Put it on your work surface. Leave the thicker edge of the dough to hang over the edge of the table. Place your hands underneath the dough and stretch and pull the dough thinner using the backs of your hands. Stretch and pull the dough until it's about 2 feet (60 cm) wide and 3 feet (90 cm) long, it will be tissue-thin by this time. Cut away the thick dough around the edges with scissors. The dough is now ready to be filled.

I made two strudels in total, and I can safely say that after several batches of baking skill re-affirming cupcakes I will be attempting this again, because even my shoddy efforts were particularly delicious it has to be said. The first was the classic apple strudel, following the recipe posted for the challenge, as follows:

Apple strudel from “Kaffeehaus – Exquisite Desserts from the Classic Cafés of Vienna, Budapest and Prague” by Rick Rodgers

2 tablespoons (30 ml) golden rum 3 tablespoons (45 ml) raisins 1/4 teaspoon ground cinnamon 1/3 cup plus 1 tablespoon (80 g) sugar 1/2 cup (1 stick / 115 g) unsalted butter, melted, divided 1 1/2 cups (350 ml) fresh bread crumbs strudel dough (recipe below) 1/2 cup (120 ml, about 60 g) coarsely chopped walnuts 2 pounds (900 g) tart cooking apples, peeled, cored and cut into ¼ inch-thick slices (use apples that hold their shape during baking)

1. Mix the rum and raisins in a bowl. Mix the cinnamon and sugar in another bowl.

2. Heat 3 tablespoons of the butter in a large skillet over medium-high. Add the breadcrumbs and cook whilst stirring until golden and toasted. This will take about 3 minutes. Let it cool completely.

3. Put the rack in the upper third of the oven and preheat the oven to 400°F (200°C). Line a large baking sheet with baking paper (parchment paper). Make the strudel dough as described below. Spread about 3 tablespoons of the remaining melted butter over the dough using your hands (a bristle brush could tear the dough, you could use a special feather pastry brush instead of your hands). Sprinkle the buttered dough with the bread crumbs. Spread the walnuts about 3 inches (8 cm) from the short edge of the dough in a 6-inch-(15cm)-wide strip. Mix the apples with the raisins (including the rum), and the cinnamon sugar. Spread the mixture over the walnuts.

4. Fold the short end of the dough onto the filling. Lift the tablecloth at the short end of the dough so that the strudel rolls onto itself. Transfer the strudel to the prepared baking sheet by lifting it. Curve it into a horseshoe to fit. Tuck the ends under the strudel. Brush the top with the remaining melted butter.

5. Bake the strudel for about 30 minutes or until it is deep golden brown. Cool for at least 30 minutes before slicing. Use a serrated knife and serve either warm or at room temperature. It is best on the day it is baked.

Yum. yum yum and yum, this was scrummy...I was happy with the dough, it did give a flaky, multi-layered-ness, as desired - even though there were a 'few' holes...sadly my photos do not do it justice, and I did get bored and eat it all rather than wait for better light, whoops! For my second attempt I mulled over several ideas, most involving rhubarb and finally settled on the title piece, Rhubarb Pecan Streusel Strudel. For this I used up the last two-thirds of my dough, stretched as thin a possible without making too many gaping holes...I lay down a 3" line of frozen rhubarb, over this I sprinkled vanilla sugar and then some creme patisserie, all finally topped with a pecan streusel. Once rolled and coated with melted butter, I popped some more streusel on top and baked for 30 minutes. Oh it was goooooooood! I will definately be doing that again once my dough rolling skills have improved. Rhubarb Pecan Streusel Strudel: 50g frozen rhubarb 3-4 tsp vanilla sugar Flan/Creme Patisserie: 90 ml double cream 3 tbsp vanilla sugar 2 tbsp cornflour 1 large egg, beaten Heat the cream to just below simmering; whisk together the egg with the cornflour & sugar. Temper half the cream with the egg mix, whisking for about a minute, then return to the pan (off the heat) and whisk well to combine for a few minutes more. Pour into a small bowl and chill immediately in an ice-bath, whisking all the time. Put in the fridge until needed.
Pecan Streusel: 1/4 cup plus two tbsp plain flour 28g butter, softened 1/4 cup vanilla sugar 1/4 cup pecans, coarsely chopped Cream the butter and sugar, then rub in the flour & pecans to make a dry, crumbly mix. Pop in the freezer to chill until needed.
...and I must add, rather yummy cold with a nice glass of bucks fizz :D

Friday, 22 May 2009

wedding cupcakes....a feat achieved...

I started at 9am this morning, and put the last cupcake in a box at 5.30pm...pretty good going I think! It was only 65 cupcakes, but for a first proper effort I am very chuffed with myself. I must thank Ikkin for her kind help with cutting out mini flowers and keeping the chatter alive (I may have gone a bit cake-feverish without her!)

Saturday, 16 May 2009

ice cream cupcakes-ish

after an exhaustive and exhausting search in all shops near me for flat bottomed ice cream cones to make proper ice cream cupcakes I had to admit defeat; getting my cake hat on, hah, I ALWAYS have my cake hat on...(hmmm, I so want a hat of cake...oooh imagine mini hats, made of cake! plans are formulating)....sorry, anyway, cake hat was on and I decided to make them ice-creamy by doing big old frosting and adding a wafer & sprinkles on top....and lo...
I experimented with a new chocolate cupcake recipe, and it is super nice, I used to always use the magnolia one but for some reason it was always very temperamental for me. Often it felt too airy leading to odd cupcakes that went a bit bubbly, and then could sink...tante irritato (sorry just seen Angels & Demons and have gone all fake-italiano). This recipe is very very easy as it is a 'dump it all in and blend' method, my first attempt at one too. Chocolate Cupcakes - makes 20 Ingredients 250g plain flour 450g caster sugar 65g cocoa powder 1 1/2 tsp baking powder 12 fl oz milk 113g butter, softened 2 tsp vanilla extract 2 large eggs Method 1. preheat oven to 180C (170C fan) 2. sift dry and add wet ingredients - except the eggs - straight into your mixer bowl 3. mix on low speed at first to avoid flour cloud, then increase to high for 2 minutes 4. add the eggs and beat again for another 2 minutes, scrape bowl and beat quickly to combine any random bits 5. fill your cupcake cases (or ice cream cones if your quest if more fruitful than mine) 2/3rds full and bake for 20-25 minutes 6. remove and leave to cool before icing Vanilla Buttercream Ingredients 226g butter, softened 750g icing sugar, sifted 2 fl oz milk 1 tsp vanilla extract Method 1. beat butter until very creamy, scrape bowl down 2. add most of the icing sugar, then the milk and vanilla - beat on a low speed (I cover my mixer with a tea towel to avoid getting mess everywhere), then increase the speed to incorporate well 3. add the rest of the icing sugar and beat again first on a low speed, then increase to high and leave for a few minutes to get a very creamy, fluffy frosting (at this point you could add cocoa, or remove half and add to make chocolate too) 4. fill a piping bag fitted with a large star tip (I have lost mine hence the round tipped piping :( meh) and pipe ice cream 99 style toppings on the cooled cupcakes. To get a high mound I make first a base of frosting, then pipe another cone on top, with a little wrist flick to get the classic ice cream tip! 5. finally pop in your wafers, I pushed mine down into the cake a bit for security, then add sprinkles of your choice! yum yum yummy yum! I'd love to serve these with a hot fudge sauce...oooooooh just think of it!

Wednesday, 6 May 2009

mini loaf cakes and a spot of millinery.

I often, of a lunch time, wander in and out of baking stores...mainly the steamer trading near my place of day work. I do indeed find it rather (cough*exceedingly*cough) over priced and invariably pick things up, carry them round the whole store with me, then pop them back down again muttering to myself and leave. then, every now and again, I have a fit of not caring about money and shoes and have a big old splurge. one such splurging occasion happened about a month ago, this being the same splurge in which I bought the overpriced tart rings (£4!!! for 4" rings! are you mad! thats a pound an inch! and now I only have two! obviously I need more than this. trapped, trapped in a cycle of ring buying...etc etc). amongst the other items bought in this splurge ( 4x dariole moulds and some miniature clothes pegs, oh and 4 mini-bowl things) I purchased 4 miniature loaf tins, so so so very cute, and have at last put them to good use. it was pointed out to me later in the day that I had bought a plethora of minature items, which whilst pleasing did not equate to a miniature total spendature. but hey ho I now have some very cute mini-baking items to coo over when I open the baking drawer. I am not someone who just dies! when they see little baby shoes, but mini baking items, oh yes, lovely! Recipe adapted from Smitten Kitchen's Lemon Yoghurt Anything Cake: Makes one large loaf tin cake or 13 mini loaf tin cakes. I first made a plain batter, leaving out any flavourings (lemon, vanilla) until I spilt the batter to make the mini versions. This cake is very moist, which I think really helps will the mini-ness as they stay lovely even though they are tiny small. I made three versions; Sour Cherry & Pecan, Almond & Rhubarb and Lemon Poppy Seed...but the possibilities are endless non? Ingredients for a plain batter which I split into three separate bowls: 1 1/2 cups plain flour 2 tsp baking powder 1/2 tsp salt 1 cup natural yoghurt 1 cup caster sugar 3 large eggs 1/2 cup vegetable oil Method Preheat the oven to 160C and grease your mini-tins (I used melted butter and a pastry brush). Sift together the flour, baking powder and salt in one bowl. In another whisk together the yoghurt, sugar, eggs and oil. Gradually add in the dry mix and whisk to a smooth batter. 1. For the Sour Cherry & Pecan I added 50g sour cherries and 25g chopped pecans. Once poured into the greased mini-tins I added a pecan streusel topping by roughly rubbing together the following, then chilling in the freezer and adding to the mini-cakes half way through baking: 1/4 cup plain flour 1/4 cup packed light brown sugar 1/4 cup coarsely chopped pecans 28g cold butter, diced small 2. For the Almond and Rhubarb I added 1/2 tsp of almond extract to the batter (add more to taste but I found this plenty). I then filled the mini-tins 2/3rds full then popped in a layer of frozen sliced rhubarb and sprinkled over a teaspoon of sugar, then poured on another layer of batter to cover and finally topped with sliced almonds. 3. For the classic Lemon Poppy Seed I added 1-2 tbsp of poppy seeds (I love them so stuck loads in), 1 tbsp of lemon juice and the finely grated zest of 1 lemon. Once out of the oven I poked some holes in the top then poured over a syrup of lemon juice and icing sugar. Bake the cakes for about 20-30 minutes, until a skewer comes out clean, the cake is moist so try not to overbake. Leave the cakes in the tins for about 10 minutes before turning out to cool completely on a rack; be careful when slicing as you could smoosh them. Yum!

Tuesday, 28 April 2009

lemon meringue pie cupcakes. word.

since the purchase of two exceptionally expensive for their size (4") tart rings I have been going tart crazy! rhubarb & custard tart with pistachio crumble, cherry tarts with ginger nut streusel and dark chocolate lemon tarts to name but three. mmmmm and hmmmmm! the last tart I made was a challenge set by a friend, whose mother apparently makes a mean lemon meringue pie, and so I stepped up! i bought jim fobel's book aeons ago and until now have only taken it down to read and sigh at, but I knew that this little puppy would be my go to book for a decent pie recipe. mainly because i judge books by their cover and have not been proved wrong here. the filling is totally delicious, not too sweet not too tart and his basic pastry is scrummy, just flaky enough. i made four mini pies for lunch dessert, and with the left over lemon filling I just had to make cupcakes of course! i used the basic magnolia vanilla cupcake recipe, removing a cone of cake once baked. I filled the hole with the yummy lemonyness and popped the trimmed cone lid back on. I then made up the meringue mix, and using a star tipped piping bag did some fancy meringue swirls on top of the cupcakes. I find that if you do a 'base' of icing swirl, then another on top of the you get a more even cover. then you just have to pop the cupcakes back in the oven for a few minutes to bake the meringue and you are done....though I did get fancy and used my kitchen blowtorch to add some deeper colour to the meringue for schmanciness! OH and LOOK I have a website! most exciting. so far it consists of but one page, but I have more on the way, perhaps even 2 or 3 pages! essentially I needed to get my act together and this is phase 2 (phase 1 was business cards from moo, i love moo). so I am getting together all my treats and delights to pop up on the site for perspective perusals and purchases (I hope!)

Monday, 27 April 2009

daring bakers challenge: my first and a cheesecake!

so very exciting indeed! I am now a member of the Daring Bakers! very pleasing and one of the reasons I got interested in blogging the first place; after seeing that most of my daily blog reads were members I did some investigatory work and finally de-lurked to sign up!
the april 2009 challenge is hosted by Jenny from Jenny Bakes. She has chosen Abbey's Infamous Cheesecake as the challenge. with my first challenge being cheesecake, I was more than happy to have a go, a nice introduction indeed! the recipe makes 1x8" cheesecake, which was more than happily gobbled right on down by my work mates. the recipe is quite different to the normal baked cheesecake recipe I use so it was great to try out a new one, and I must say it is superbly divine!
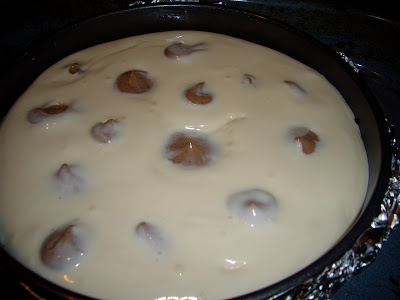
the alterations I made was to make an Oreo cookie base, to which I REALLY wanted to add popping candy (have done this before to great success) but alas none was to be found, moop :( next time! :) next I removed 2 cups of the filling, poured the remainder over the set base, then mixed the 2 cups worth with 2oz of melted dark chocolate. I then piped this back into the cheesecake in balls** to make polka-dots, which I had seen in a magazine during the week and just had to try out, it was pleasingly successful (thank goodness!). lastly I made a chocolate ganache and poured this over the baked cheesecake, before leaving to set in the fridge overnight.
Abbey's Infamous Cheesecake:
Crust:
2 cups / 180 g graham cracker crumbs
1 stick / 4 oz butter, melted
2 tbsp. / 24 g sugar
1 tsp. vanilla extract
Cheesecake:
3 sticks of cream cheese, 8 oz each (total of 24 oz) room temperature
1 cup / 210 g sugar
3 large eggs
1 cup / 8 oz heavy cream
1 tbsp. lemon juice
1 tbsp. vanilla extract (or the innards of a vanilla bean)
1 tbsp liqueur, optional, but choose what will work well with your cheesecake
DIRECTIONS:
1. Preheat oven to 350 degrees F (Gas Mark 4 = 180C = Moderate heat). Begin to boil a large pot of water for the water bath.
2. Mix together the crust ingredients and press into your preferred pan. You can press the crust just into the bottom, or up the sides of the pan too - baker's choice. Set crust aside.
3. Combine cream cheese and sugar in the bowl of a stand-mixer (or in a large bowl if using a hand-mixer) and cream together until smooth. Add eggs, one at a time, fully incorporating each before adding the next. Make sure to scrape down the bowl in between each egg. Add heavy cream, vanilla, lemon juice, and alcohol and blend until smooth and creamy.
4. Pour batter into prepared crust and tap the pan on the counter a few times to bring all air bubbles to the surface. Place pan into a larger pan and pour boiling water into the larger pan until halfway up the side of the cheesecake pan. If cheesecake pan is not airtight, cover bottom securely with foil before adding water.
5. Bake 45 to 55 minutes, until it is almost done - this can be hard to judge, but you're looking for the cake to hold together, but still have a lot of jiggle to it in the center. You don't want it to be completely firm at this stage. Close the oven door, turn the heat off, and let rest in the cooling oven for one hour. This lets the cake finish cooking and cool down gently enough so that it won't crack on the top. After one hour, remove cheesecake from oven and lift carefully out of water bath. Let it finish cooling on the counter, and then cover and put in the fridge to chill. Once fully chilled, it is ready to serve.
**polka-dotting, an almost how to: thought I should update my post to include an attempt at a guide to creating the dots in the cheesecake.
I removed 2 cups worth of the plain batter, and mixed it with 2oz melted dark (73%) chocolate. I poured this into a piping bag with a 1/2" tip...then to create the dots. Insert the tip of the bag about 1/4-1/2" into the top of the cheesecake, starting in the centre. Squeeze out enough batter to make a 2" round ball - now this bit is down to confidence and guesswork.
I used the same piping technique as when piping truffles, firmly hold the bag and pipe anti-clockwise with a gentle pressure, whilst moving the bag up at the same time. I tried to imagine I was piping the filling into a ping-pong ball if that makes sense, visualising the dots!
Repeat the dotting as many times as you want, most recipes I saw on the net said to be all symmetrical but I don't go in for all that and like the randomness of mine. BUT do not be afraid, do not fear the dot...I had not done this before and did freak a bit as I was about to pipe but all was well in the end! here is a pic of the pre-baking just dotted cake if it helps too... elle x

Thursday, 9 April 2009

chocolate earl grey tea cookies

mmmmmmmmmmmmmmmmmmmmmmmmmmmmmmmmmmmmm!
tea? anyone? coookie? yes? good. ingredients 2 cups plain flour 1/2 cup cocoa 1/2 cup caster sugar 1/2 cup icing sugar 6 earl grey teabags worth of tea (about 2 tbsps if loose already) 1/2 tsp salt 1 tsp vanilla extract 1 cup (225g) unsalted butter, cold and cut into small pieces cold water method 1. whizz up all the dry ingredients in a food processor, this will also break down the tea at the same time 2. add the vanilla and butter, pulse, then add the water a tiny drizzle at a time until the dough comes together - keep it dry rather than wet, about 1 tsp water is enough 3. tip out mix onto some baking paper, bring together, shape into a log and wrap in the paper. Pop in the fridge for a minimum of 30 minutes - preheat oven to 190C (180C if your oven is hot hot hot like mine) 4. remove the cookie log from the fridge and slice into discs, about 1/2 inch wide 5. place on baking paper on trays and bake in the centre of the oven for 8-10 minutes; remove and allow to cool completely on the baking paper on some cooling racks before devouring with a nice cup-o-tea!

Sunday, 22 March 2009

happy mother's day; brioche and lemon curd macaroons

the sun has been shining all weekend on the south coast, and a wander along the sea-front was significantly improved by the spotting of a rogue giant bubble! I have been on a bread baking adventure this week, on Wednesday I made cider vinegar english muffins (yum), and for Sunday morning I prepared my mum's favourite...Brioche!
On my sea-front wander I also found some luscious lemons which were just to perfect not to buy; the majority were used up in an exceedingly delightful (and rather large) lemon layer cake. This did however leave me with a vast amount of egg whites, and what else could I make but some zest lemon macaroons, filled with lemon curd of course!
The first time I attempted lemon curd it was a complete and total disaster, now having successfully made two batches I have decided to blame the recipe and happily recommend the below:
Lemon Curd
Ingredients
2 large egg yolks
1/3 cup granulated sugar
1/4 cup fresh lemon juice
2 tbsp (28g) unsalted butter, softened
pinch of salt
Method
1. Whisk the yolks and sugar together in a thick bottomed saucepan until combined
2. Whisk in the lemon juice, butter and salt
3. Cook over a med-low heat, stirring constantly with a wooden spoon, for 5-6 minutes until the mixture turns opaque, thickens and coats the back of a teaspoon. Do NOT let it boil.
4. If you have rogue lemon pith in the curd then pour through a fine sieve into a small bow
5. Cartouche (press greaseproof paper to the surface) and allow to cool, then refrigerate until needed
Lemon Macaroons
Ingredients
180g finely ground almonds
240g icing sugar
140g egg whites, aged - separate from the yolks at least the night before and bring to room temp before using
2g salt, ground
80g granulated sugar
finely grated lemon zest
few drops of yellow food dye
Method
1. Sift together the almond flour, icing sugar and salt in a large bowl. Set aside.
2. Whip the egg whites until rather fluffy, then continuing to whip, gradually add the sugar & a few drops of food dye, until stiff but not dry peaks form
3. Add the dry ingredients and the lemon zest to the egg whites; fold with a spatula until a shiny mass forms
4. Fill a piping bag with a 1/3" tip and pipe small rounds (about 1 1/2" diameter) onto baking trays lined with baking paper (I pre-cut out the baking paper and pipe out all the batter first, this does cover the entire kitchen with macaroons but it makes the process much easier!)
5. Leave the macaroons to dry for about 30-45 minutes, you want the tops to be dry when you touch them
6. Preheat the oven to 180C; place one tray in the oven at a time and reduce the temperature to 145C, bake for 10 minutes then rotate and bake for another 5
7. Remove from the oven and cool - I remove mine from the baking paper immediately as I find the can stick but experimentation is key!
8. Once cool match up you macaroons and sandwich together with your filling.
I filled mine with my lemon curd that I had mixed into some basic buttercream (butter and icing sugar beaten together until fluffy, then beat in the lemon curd)...

Sunday, 15 March 2009

red nose day, cupcakes & cookies

my mum asked me to bake some goodies for her to sell for red nose day; on offer were Red Nose Sugar Cookies, Iced Vanilla Cupcakes and Red Velvet Cupcakes (no prizes for guessing which ran out first!)...and £155 was rasied for comic relief!

Monday, 9 March 2009

almond croissants and a sunday morning

the sun has appeared! and with it the tweets of various spring time birds, which can be heard through my open (!) kitchen window. what else could complete this nice twee scene that the weekend papers, a nice cup of hot coffee and some freshly baked almond croissants....
yum. happy sunday everyone!

Sunday, 8 March 2009

egg custard tarts

the 8 egg yolks had now been glaring at me from their ice cube tray compartments for 2 days now, a necessary but unfortunate by product of this cake, and at 10pm tonight I finally decided what to make. Egg custard tarts are simply awesome, they instantly take me back to small childhood memories of being allowed one as a treat from the bakers in the village I grew up in (ha, no, I did not grow up in a Famous Five book...I wish!). A nice melt-in-the-mouth sweet pastry, a firm but silky custard filling, topped with a sprinkling of nutmeg...mmmmmmm...and here is how...
Ingredients
Pastry
90g cold butter, diced
125g plain flour
25g icing sugar
1 egg yolk
ice cold water
(I use a food processor to make the pastry so this is the method I will put here; this makes enough to line 1x9" case, or 5x4" cases)
Filling
4 large egg yolks
1/2 cup caster sugar
2/3 cup milk (I used skimmed so any fat content is fine)
ground nutmeg
Method
1. Put the flour, icing sugar and cold butter in the bowl of your food processor, with the knife blade in place. Pulse until the mix resembles very fine breadcrumbs.
2. Add the egg yolk and pulse again to incorporate
3. Add ice cold water a dribble at a time whilst pulsing, you only need a little, until the pastry comes together and forms a loose ball
4. Wrap the pastry in baking paper and pop it in the fridge for 20 mins to chill
5. Preheat your oven to 180C/350F and move the racks to the middle
6. Grease your tart cases (or you can use a muffin tin), flour a clean surface and roll out your pastry
7. Line your chosen cases and trim the excess pastry off
8. Scrumple up some baking paper and line the cases, fill with baking beads - push to the edges to stop shrinkage
9. Blind bake the cases for 15 mins, then remove the beads and paper and cook for another 5-10 minutes. This will vary depending on the size of case you are making.
10. Whilst the cases are baking make the filling by first hand whisking together the egg yolks and sugar until the sugar is pretty much dissolved
11. Whisk in the milk, try not to make the mix too foamy
12. Fill your baked cases to the top with the egg mixture and dust the tops with nutmeg
13. Pop back in the oven for 15-25 minutes (again dependent on tart size) until the filling is set but still a bit wobbly
14. Cool completely on a rack before removing from the baking cases

Thursday, 26 February 2009

flourless poppy seed cake

there comes a time when even I can no longer stand to see the glum look on the gluten-free people on my floor at work when I take in my baked treats, and so when I stumbled across this little number on Chocolate & Zucchini I knew it had to be made. I love poppy seeds, love love love them, their flvour is so divine and this cake is ram-packed full of them, giving it a that wonderful nutty taste with every bite.
I have an odd relationship with almonds, I can not stand the taste of them, but I have been using them increasingly in my baking and find that I do like the flavour when it is not simply a block of marzipan (triple yuk). This recipe calls for Almond Butter, which blew my mind, what was this, where do I get it? A quick google later and I discovered to my glee that it is easy-peasy to make, all you need are some whole almonds. A simple toasting in the oven, then blitz them up in a food processor for a fair old while until the oil is released and the butter forms! I added a dribble of veg oil when I could see a slight gooeyness and this brought it all together into a buttery paste ball thing, success! And think of the possibilities! Cashew Butter, Pecan Butter...amazing!
Ingredients
60g butter, room temp
60g almond butter
125g soft light brown sugar
zest of one orange, finely grated
4 eggs, separated
100g ground almonds
160g poppy seeds
pinch of salt
1tsp baking powder
Method
1. Preheat oven to 180C and grease an 8" round cake pan
2. In a stand mixer bowl combine the butter and almond butter with 100g of the sugar and the orange zest; Cream for 2 minutes
3. Add the egg yolks and mix again until fluffy
4. In a medium bowl combine the ground almond and the poppy seeds, set aside
5. In another bowl combine the egg whites with the salt and baking powder. Beat until fluffy then add the remaining 25g of sugar, and beat again until the egg whites are nice and glossy (the old hold the bowl over your head trick stage of thickness -stiff but not dry)
6. Fold 1/3rd of the whites into the butter batter - working with a very light hand - then fold in half the poppy seed mix. Repeat with another 3rd of the egg whites, and the last half of the poppy seeds, and finally the rest of the egg whites. All the time working lightly so as to combine the ingredients but not to knock the air out of rht egg whites.
7. Pour into the prepated cake pan and bake for 30 minutes, or until golden brown, mine took 25 mins but my oven is quite hot. Turn the oven off and leave the cake inside for a further 10 minutes.
8. Remove and leave to cool for another 10 minutes, then loosen and unmold from the pan, leaving to cool completetly before glazing*
*the glaze - which I forgot to do...whoops:
30g icing sugar
2tsp fresh organe juice
-mix and pour over the cake, leave to set.
I think it is a good idea to glaze as the cake does get a bit drier the following day...so next time I will endeavour to remember...