Showing posts with label daring bakers. Show all posts

Thursday, 28 October 2010

daring bakers: doughnuts, donuts, whatever...fried batter


The October 2010 Daring Bakers challenge was hosted by Lori of Butter Me Up. Lori chose to challenge DBers to make doughnuts. She used several sources for her recipes including Alton Brown, Nancy Silverton, Kate Neumann and Epicurious.

I was just looking for an excuse to make my coffee and doughnut cupcakes again, so this challenge combined with a work colleagues leaving day was the perfect opportunity!

Wednesday, 28 April 2010

daring bakers: sussex pond, an english pudding


The April 2010 Daring Bakers’ challenge was hosted by Esther of The Lilac Kitchen. She challenged everyone to make a traditional British pudding using, if possible, a very traditional British ingredient: suet.

Sunday, 28 March 2010

daring bakers: orange tian


 The 2010 March Daring Baker’s challenge was hosted by Jennifer of Chocolate Shavings. She chose Orange Tian as the challenge for this month, a dessert based on a recipe from Alain Ducasse’s Cooking School in Paris.

Oh are these yummy!  crumbly, buttery biscuit smeared with homemade marmalade, topped with marmalade swirled whipped cream and caramel soaked orange segments....  sounds like an m&s advert!


never having made the biscuit or the caramel before, this was a great challenge, I love layered desserts and this one is a keeper.


Wednesday, 27 January 2010

daring bakers: nanaimo bars


The January 2010 Daring Bakers’ challenge was hosted by Lauren of Celiac Teen. Lauren chose Gluten-Free Graham Wafers and Nanaimo Bars as the challenge for the month. The sources she based her recipe on are 101 Cookbooks and www.nanaimo.ca.

So firstly I spent quite a long time trying to work out how to say nanaimo without people saying, nemo bars?  like the fish?  Then I got onto the thinking about how awesome these bars are, custard buttercream! yum. crunchy base, gooey middle and chocolate top. bliss.  lots and lots of complements from my team at work who invariably get to taste test anything I bake on whims or for challenges.

Sunday, 27 September 2009

daring bakers: pate feuilletee


the september 2009 daring bakers' challenge was hosted by steph of a whisk and a spoon.  she chose the french treat, vols-au-vent based on the puff pastry recipe by michel richard from the cookbook baking with julia by dorie greenspan.

i have been blathering on about wanting to make pate feuilletee (le puff pastry) for a fair old while now, so this challenge, and a new kitchen table (!) gave me the ultimate opportunity.  I was worried a little about the daunting task of making this pastry, mainly because everyone always says its either too hard or takes too long to bother with.  But I have to say I was exceedingly pleased, time wise the first 4 turns went smoothly and quickly, then I left it overnight in the fridge and completed the last two turns and baked it the following day.


being all about the sweet things in life my vols-au-vent are filled with layered raspberry compote and vanilla custard cream, topped with fresh raspberries.  I used the rest of the pastry to make a raspberry and custard cream mille-feuille, some vanilla sugar plamiers and, just because, some cinnamon pin-wheels. yum!

Thursday, 27 August 2009

Daring Bakers: Dobos Torta

just a note....blogger is driving me nuts, merging all my text! ack!
August's Daring Bakers' Challenge was hosted by Angela of A Spoonful of Sugar and Lorraine of Not Quite Nigella. They chose the spectacular Dobos Torte based on a recipe from Rick Rodgers' cookbook Kaffeehaus: Exquisite Desserts from the Classic Caffes of Vienna, Budapest, and Prague.

sponge cake layers
6 large eggs, separated and at room temperature
1 1/3c icing sugar, divided
1tsp vanilla extract
95g plain flour + 17g cornflour
pinch of salt
2oz shelled pistachio nuts, quite finely chopped

chocolate buttercream
4 large eggs, at room temperature
1c caster sugar
110g dark chocolate
250g butter, at room temperature

caramel topping
1c caster sugar
180ml water
40ml lemon juice
1tbsp sunflower oil

finishing touches
whole, shelled pistachios
5oz shelled and roughly chopped pistachios

methods...
sponge layers
1. position racks in top and centre thirds of the oven and heat to 200C

2. cut 6 pieces of baking paper to fit the baking sheets - using a 9" cake pan draw a circle on each...as I made lots of mini tortas I drew round a 4" tart ring 6 times on each sheet. thus each tray would be for one cake, I made 6 mini cakes in total. make sure you turn the paper over...pen ink cake is not good!

3. beat the egg yolks with 2/3c icing sugar, and the vanilla in a medium bowl with a mixer on high speed until the mixture is thick, pale yellow and forms a thick ribbon when the beaters are lifted a few inches above the batter, about 3 minutes.

4. in another bowl, using clean beaters, beat the egg whites until soft peaks form. gradually beat in the remaining 2/3c icing sugar until the whites firm stiff, shiny peaks. using a large rubber spatula, stir in about 1/4 of the beaten whites into the egg yolk mixture, then fold in the remainder, leaving a few wisps of the white visible. combine the flour and salt. sift half the flour over the eggs, and fold in; repeat with the remaining flour...at this point I folded in chopped pistachios and a little green dye...

5. line one of the baking sheets with a circle-marked paper. using a small offset spatula, spread about 3/4c (I used about 1 1/2tbsp for my mini ones) of the batter in an eve layer, filling in the traced circle on one baking sheet. bake on the top shelf for 5mins (mine took about 3mins). keep repeating this process with the other papers and cake mix. when the cakes are done invert onto a flat surface and carefully peel back the paper, slide the cake layer back onto the paper to cool. trim each layer into a neat round using a sharp knife, I used a large cookie cutter to trim mine to about 3".

chocolate buttercream
1. prepare a double boiler

2. whisk the eggs with the sugar until pale and thickened, about 5mins

3. fit the bowl over the boiling water in the saucepan. cook the egg mix, whisking constantly, for 2-3mins until it thickens a bit. whisk in the finely chopped chocolate and cook, stirring, for a further 2-3mins

4. scrape the chocolate mixture into a medium bowl and leave to cool to room temperature. it should be quite thick and sticky in consistency

5. when cool, beat in the butter, a small piece at a time, using an electric hand whisk. you should end up with a thick, velvety chocolate buttercream. chill while you make the caramel topping

caramel buttercream
1. choose the best looking cake layers for the caramel tops

2. line a baking sheet with parchment and butter, place the cake layers on the paper and divide into 6 equal wedges (if doing the one large cake, using just one layer and split into 12)

3. stir the sugar, water and lemon juice in a small saucepan. bring to the boil over a medium heat stirring often to dissolve the sugar. once dissolved into a smooth syrup, turn up the heat to high and boil without stirring, swirling the pan by the handle occasionally until the syrup has turned into an amber-coloured caramel

4. pour, very quickly and evenly, over the cake wedges, spread with a spatula to get an even coverage

5. leave to cool the cut our the wedges with a sharp knife

assembling the dobos
1. spread a layer of buttercream on one of the cake layers, repeating til you have 5 layers stacked up. cover the sides and top of the cake...repeat with the remaining mini cakes! this took AGES! damn my mini-cakes!

2. press the chopped nuts round the sides of the cake

3. propping a pistachio under each wedge so the it sits at an angle, arrange the wedges on top of the cakes in a spoke pattern

4. refrigerate until icing is set, about 2 hours, let slices come to room temperature for best possible flavour

Monday, 27 July 2009

daring bakers challenge: teacakes! ...(mallows)...

The July Daring Bakers' challenge was hosted by Nicole at Sweet Tooth. She chose Chocolate Covered Marshmallow Cookies and Milan Cookies from pastry chef Gale Gand of the Food Network. time and life stopped me make the milan cookies, saved for a later date for sure, but I did conquer the mallows!
totally splendid, was pretty nervy about the marshmallows but was really happy with them. I think next time I will have a bit more confidence to make sure the mallow top covers the cookie nicely - was more worried about getting it all over the place so think I may have been a bit over cautious - but that did result in more mallows! Mallow...teacake, for the brits...Recipe For the cookie base 3 cups plain flour
1/2 cup caster sugar
1/2 tsp salt
3/4 tsp baking powder
3/8 bicarbonate of soda
1/2 tsp ground cinnamon...which I forgot! darn.
170g unsalted butter
3 large eggs, whisked together
homemade marshmallows - as below
chocolate gaze - as below
1. blend the dry ingredients in amixer
2. on a low speed add the butter and mix til sandy
3. add the eggs and mix to combine
4. form the dough into a disk, wrap in clingfilm and chill for at least 1 hour - up to 3 days
5. line baking trays with baking paper
6. preheat oven to 375F/180C
7. roll out cookie dough to 1/8" thick, on a lightly floured surface. use a 1 1/2 inch cookie cutter - or a small plastic tube
if you are me - to cut out small rounds of dough
8. transfer to the prepped pan and bake for 10 minutes or until light golden brown - let cool to room temperature
9. pipe a 'kiss' of marshmallow onto each cookie. let sit at room temperature for 2 hours
10. line a cookie sheet with baking paper
11. one at a time, gently drop the marshmallow-topped cookies into the hot chocolate glaze
12. lift out with a fork and let excess chocolate drip back into the bowl
13. place on the prepped pan and let set at room temperature until coating is firm, about 1-2 hours
marshmallow recipe
1/4 cup water
1/4 cup light corn syrup - i used golden syrup
3/4 cup caster sugar
1 tbsp powdered gelatin - I could only find sheet gelatin, 4 sheets of which I softened in water, drained and added to the
syrup off the heat
2 tbsp cold water - omitted due to use of sheet gelatin
2 egg whites, room temp
1/4 tsp vanilla extract - omitted, I split the mixture and added 1tsp rose water with pink dye to one half, and 2tsp cocoa
in 1tbsp water to the other
1. in a saucepan, combine the water, syrup and sugar, bring to "soft-ball" stage (235C)
2. sprinkle gelatin over the cold water and let dissolve - if sheet gelatin like me, soften in water for 10 mins
3. remove syrup from heat and add gelatin (drain first if using sheets)
4. whip the egg whites until soft peaks form and pour the syrup into the whites
5. add the vanilla - or as I did, rose water or chocolate - and continue whipping until stiff
6. transfer to piping bag - I piped the rose half, and poured the chocolate half into an oiled and icing-sugared tray to set, for cutting int o squares and tossing in cocoa
chocolate glaze - I made half with milk chocolate and half with dark...yummy!
12oz chocolate
2oz vegetable oil
1. melt the 2 ingredients together in a bowl set over simmering water

Saturday, 27 June 2009

daring bakers challenge: bakewell tarts, a few berries and some rhubarb

The June Daring Bakers' challenge was hosted by Jasmine of Confessions of a Cardamom Addict and Annemarie of Ambrosia and Nectar. They chose a Traditional (UK) Bakewell Tart... er... pudding that was inspired by a rich baking history dating back to the 1800's in England.
Never been a massive fan of Bakewell Tarts, all stemming from my aversion to almonds, which I am working, and also the fact that my first inrroduction to them was thos sticky little Mr K ones that I know everyone LOVES but I simply can not abide.
But I have been getting better with my almond uncertainty latley, and thusly charged right in to this challenge...so far in, infact, that I made 4 different types. Using the sweet shortcrust recipe given in the challenge (below) I made reaspberry, blackcurrant and rhubarb tarts...and then to use up come chocolate pastry I had lying about I made some morello cherry ones. Oh yum! They were so good...and I do like bakewell tart it seems, fantastic!
The Recipes - to make 5x 3" tarts and 1x 5x13" tart...
Sweet Shortcrust Pastry
225g plain flour
30g sugar
1/2tsp salt
110g unsalted butter, cold/frozen
2 egg yolks
1/2tsp almond extract
1-2tbsp cold, cold water
Sift together flour, sugar and salt. Grate butter into the flour mixture, using the large hole-side of a box grater. Using your finger tips only, and working very quickly, rub the fat into the flour until the mixture resembles bread crumbs. Set aside. Lightly beat the egg yolks with the almond extract (if using) and quickly mix into the flour mixture. Keep mixing while dribbling in the water, only adding enough to form a cohesive and slightly sticky dough. Form the dough into a disc, wrap in cling and refrigerate for at least 30 minutes
Frangipane
125g (4.5oz) unsalted butter, softened
125g (4.5oz) icing sugar
3 (3) eggs
2.5ml (½ tsp) almond extract
125g (4.5oz) ground almonds
30g (1oz) all purpose flour
Cream butter and sugar together for about a minute or until the mixture is primrose in colour and very fluffy. Scrape down the side of the bowl and add the eggs, one at a time, beating well after each addition. After all three are in, pour in the almond extract and mix for about another 30 seconds and scrape down the sides again. With the beaters on, spoon in the ground nuts and the flour. Mix well. The mixture will be soft, keep its slightly curdled look (mostly from the almonds) and retain its pallid yellow colour.
Assembling the Bakewell Tarts
Place the chilled dough disc on a lightly floured surface. If it's overly cold, you will need to let it become acclimatised for about 15 minutes before you roll it out. Flour the rolling pin and roll the pastry to 5mm (1/4”) thickness, by rolling in one direction only (start from the centre and roll away from you), and turning the disc a quarter turn after each roll. When the pastry is to the desired size and thickness, transfer it to the tart tins, press in and trim the excess dough. Patch any holes, fissures or tears with trimmed bits. Chill in the freezer for 15 minutes.
Preheat oven to 200C
Remove shell from freezer, spread as even a layer as you can of jam onto the pastry base. Top with frangipane, spreading to cover the entire surface of the tart. Smooth the top and pop into the oven for 30 minutes. Five minutes before the tart is done, the top will be poofy and brownish. If desired - remove from oven and strew flaked almonds on top and return to the heat for the last five minutes of baking.
The finished tart will have a golden crust and the frangipane will be tanned, poofy and a bit spongy-looking. Remove from the oven and cool on the counter.

Monday, 25 May 2009

daring bakers challenge: rhubarb pecan streusel strudel

Mmmmm hmmmm I love me some strudel, oh yes indeedy.... but boy oh boy is that strudel dough a puzzler. The recipe is very simple, and the instructions easy enough, but to achieve a perfectly stretched, tissue thin dough is tricker than Mr Trick and his tricky box of super tricky tricks! Going into the challenge with my usual gusto I did find myself pulled up rather short once it came to the dough stretchy part, but enough of my dough-woe... The May Daring Bakers’ challenge was hosted by Linda of make life sweeter! and Courtney of Coco Cooks. They chose Apple Strudel from the recipe book Kaffeehaus: Exquisite Desserts from the Classic Cafés of Vienna, Budapest and Prague by Rick Rodgers... And here is said recipe; first up the dough... Strudel dough from “Kaffeehaus – Exquisite Desserts from the Classic Cafés of Vienna, Budapest and Prague” by Rick Rodgers

1 1/3 cups (200 g) unbleached flour 1/8 teaspoon salt 7 tablespoons (105 ml) water, plus more if needed 2 tablespoons (30 ml) vegetable oil, plus additional for coating the dough 1/2 teaspoon cider vinegar

1. Combine the flour and salt in a stand-mixer fitted with the paddle attachment. Mix the water, oil and vinegar in a measuring cup. Add the water/oil mixture to the flour with the mixer on low speed. You will get a soft dough. Make sure it is not too dry, add a little more water if necessary. Take the dough out of the mixer. Change to the dough hook. Put the dough ball back in the mixer. Let the dough knead on medium until you get a soft dough ball with a somewhat rough surface.

2. Take the dough out of the mixer and continue kneading by hand on an unfloured work surface. Knead for about 2 minutes. Pick up the dough and throw it down hard onto your working surface occasionally. Shape the dough into a ball and transfer it to a plate. Oil the top of the dough ball lightly. Cover the ball tightly with plastic wrap. Allow to stand for 30-90 minutes (longer is better).

3. It would be best if you have a work area that you can walk around on all sides like a 36 inch (90 cm) round table or a work surface of 23 x 38 inches (60 x 100 cm). Cover your working area with table cloth, dust it with flour and rub it into the fabric. Put your dough ball in the middle and roll it out as much as you can. Pick the dough up by holding it by an edge. This way the weight of the dough and gravity can help stretching it as it hangs. Using the back of your hands to gently stretch and pull the dough. You can use your forearms to support it.

4. The dough will become too large to hold. Put it on your work surface. Leave the thicker edge of the dough to hang over the edge of the table. Place your hands underneath the dough and stretch and pull the dough thinner using the backs of your hands. Stretch and pull the dough until it's about 2 feet (60 cm) wide and 3 feet (90 cm) long, it will be tissue-thin by this time. Cut away the thick dough around the edges with scissors. The dough is now ready to be filled.

I made two strudels in total, and I can safely say that after several batches of baking skill re-affirming cupcakes I will be attempting this again, because even my shoddy efforts were particularly delicious it has to be said. The first was the classic apple strudel, following the recipe posted for the challenge, as follows:

Apple strudel from “Kaffeehaus – Exquisite Desserts from the Classic Cafés of Vienna, Budapest and Prague” by Rick Rodgers

2 tablespoons (30 ml) golden rum 3 tablespoons (45 ml) raisins 1/4 teaspoon ground cinnamon 1/3 cup plus 1 tablespoon (80 g) sugar 1/2 cup (1 stick / 115 g) unsalted butter, melted, divided 1 1/2 cups (350 ml) fresh bread crumbs strudel dough (recipe below) 1/2 cup (120 ml, about 60 g) coarsely chopped walnuts 2 pounds (900 g) tart cooking apples, peeled, cored and cut into ¼ inch-thick slices (use apples that hold their shape during baking)

1. Mix the rum and raisins in a bowl. Mix the cinnamon and sugar in another bowl.

2. Heat 3 tablespoons of the butter in a large skillet over medium-high. Add the breadcrumbs and cook whilst stirring until golden and toasted. This will take about 3 minutes. Let it cool completely.

3. Put the rack in the upper third of the oven and preheat the oven to 400°F (200°C). Line a large baking sheet with baking paper (parchment paper). Make the strudel dough as described below. Spread about 3 tablespoons of the remaining melted butter over the dough using your hands (a bristle brush could tear the dough, you could use a special feather pastry brush instead of your hands). Sprinkle the buttered dough with the bread crumbs. Spread the walnuts about 3 inches (8 cm) from the short edge of the dough in a 6-inch-(15cm)-wide strip. Mix the apples with the raisins (including the rum), and the cinnamon sugar. Spread the mixture over the walnuts.

4. Fold the short end of the dough onto the filling. Lift the tablecloth at the short end of the dough so that the strudel rolls onto itself. Transfer the strudel to the prepared baking sheet by lifting it. Curve it into a horseshoe to fit. Tuck the ends under the strudel. Brush the top with the remaining melted butter.

5. Bake the strudel for about 30 minutes or until it is deep golden brown. Cool for at least 30 minutes before slicing. Use a serrated knife and serve either warm or at room temperature. It is best on the day it is baked.

Yum. yum yum and yum, this was scrummy...I was happy with the dough, it did give a flaky, multi-layered-ness, as desired - even though there were a 'few' holes...sadly my photos do not do it justice, and I did get bored and eat it all rather than wait for better light, whoops! For my second attempt I mulled over several ideas, most involving rhubarb and finally settled on the title piece, Rhubarb Pecan Streusel Strudel. For this I used up the last two-thirds of my dough, stretched as thin a possible without making too many gaping holes...I lay down a 3" line of frozen rhubarb, over this I sprinkled vanilla sugar and then some creme patisserie, all finally topped with a pecan streusel. Once rolled and coated with melted butter, I popped some more streusel on top and baked for 30 minutes. Oh it was goooooooood! I will definately be doing that again once my dough rolling skills have improved. Rhubarb Pecan Streusel Strudel: 50g frozen rhubarb 3-4 tsp vanilla sugar Flan/Creme Patisserie: 90 ml double cream 3 tbsp vanilla sugar 2 tbsp cornflour 1 large egg, beaten Heat the cream to just below simmering; whisk together the egg with the cornflour & sugar. Temper half the cream with the egg mix, whisking for about a minute, then return to the pan (off the heat) and whisk well to combine for a few minutes more. Pour into a small bowl and chill immediately in an ice-bath, whisking all the time. Put in the fridge until needed.
Pecan Streusel: 1/4 cup plus two tbsp plain flour 28g butter, softened 1/4 cup vanilla sugar 1/4 cup pecans, coarsely chopped Cream the butter and sugar, then rub in the flour & pecans to make a dry, crumbly mix. Pop in the freezer to chill until needed.
...and I must add, rather yummy cold with a nice glass of bucks fizz :D

Monday, 27 April 2009

daring bakers challenge: my first and a cheesecake!

so very exciting indeed! I am now a member of the Daring Bakers! very pleasing and one of the reasons I got interested in blogging the first place; after seeing that most of my daily blog reads were members I did some investigatory work and finally de-lurked to sign up!
the april 2009 challenge is hosted by Jenny from Jenny Bakes. She has chosen Abbey's Infamous Cheesecake as the challenge. with my first challenge being cheesecake, I was more than happy to have a go, a nice introduction indeed! the recipe makes 1x8" cheesecake, which was more than happily gobbled right on down by my work mates. the recipe is quite different to the normal baked cheesecake recipe I use so it was great to try out a new one, and I must say it is superbly divine!
the alterations I made was to make an Oreo cookie base, to which I REALLY wanted to add popping candy (have done this before to great success) but alas none was to be found, moop :( next time! :) next I removed 2 cups of the filling, poured the remainder over the set base, then mixed the 2 cups worth with 2oz of melted dark chocolate. I then piped this back into the cheesecake in balls** to make polka-dots, which I had seen in a magazine during the week and just had to try out, it was pleasingly successful (thank goodness!). lastly I made a chocolate ganache and poured this over the baked cheesecake, before leaving to set in the fridge overnight.
Abbey's Infamous Cheesecake:
Crust:
2 cups / 180 g graham cracker crumbs
1 stick / 4 oz butter, melted
2 tbsp. / 24 g sugar
1 tsp. vanilla extract
Cheesecake:
3 sticks of cream cheese, 8 oz each (total of 24 oz) room temperature
1 cup / 210 g sugar
3 large eggs
1 cup / 8 oz heavy cream
1 tbsp. lemon juice
1 tbsp. vanilla extract (or the innards of a vanilla bean)
1 tbsp liqueur, optional, but choose what will work well with your cheesecake
DIRECTIONS:
1. Preheat oven to 350 degrees F (Gas Mark 4 = 180C = Moderate heat). Begin to boil a large pot of water for the water bath.
2. Mix together the crust ingredients and press into your preferred pan. You can press the crust just into the bottom, or up the sides of the pan too - baker's choice. Set crust aside.
3. Combine cream cheese and sugar in the bowl of a stand-mixer (or in a large bowl if using a hand-mixer) and cream together until smooth. Add eggs, one at a time, fully incorporating each before adding the next. Make sure to scrape down the bowl in between each egg. Add heavy cream, vanilla, lemon juice, and alcohol and blend until smooth and creamy.
4. Pour batter into prepared crust and tap the pan on the counter a few times to bring all air bubbles to the surface. Place pan into a larger pan and pour boiling water into the larger pan until halfway up the side of the cheesecake pan. If cheesecake pan is not airtight, cover bottom securely with foil before adding water.
5. Bake 45 to 55 minutes, until it is almost done - this can be hard to judge, but you're looking for the cake to hold together, but still have a lot of jiggle to it in the center. You don't want it to be completely firm at this stage. Close the oven door, turn the heat off, and let rest in the cooling oven for one hour. This lets the cake finish cooking and cool down gently enough so that it won't crack on the top. After one hour, remove cheesecake from oven and lift carefully out of water bath. Let it finish cooling on the counter, and then cover and put in the fridge to chill. Once fully chilled, it is ready to serve.
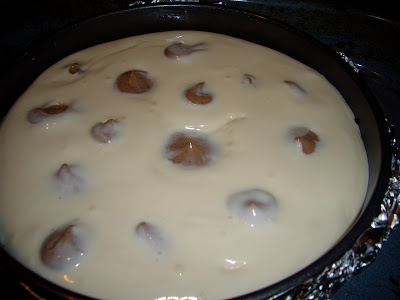
**polka-dotting, an almost how to: thought I should update my post to include an attempt at a guide to creating the dots in the cheesecake.
I removed 2 cups worth of the plain batter, and mixed it with 2oz melted dark (73%) chocolate. I poured this into a piping bag with a 1/2" tip...then to create the dots. Insert the tip of the bag about 1/4-1/2" into the top of the cheesecake, starting in the centre. Squeeze out enough batter to make a 2" round ball - now this bit is down to confidence and guesswork.
I used the same piping technique as when piping truffles, firmly hold the bag and pipe anti-clockwise with a gentle pressure, whilst moving the bag up at the same time. I tried to imagine I was piping the filling into a ping-pong ball if that makes sense, visualising the dots!
Repeat the dotting as many times as you want, most recipes I saw on the net said to be all symmetrical but I don't go in for all that and like the randomness of mine. BUT do not be afraid, do not fear the dot...I had not done this before and did freak a bit as I was about to pipe but all was well in the end! here is a pic of the pre-baking just dotted cake if it helps too... elle x