Thursday 25 September 2008

chocolatey chocolate chocolate cake with...chocolate

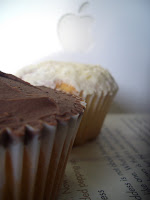
birthday cakes should always be exactly said birthday persons favourite cake, and no one likes a birthday person more than one who likes chocolatey chocolate chocolate cake, with extra chocolate. hell no.
so, this is actually the Magnolia bakery chocolate muffin recipe, but spilt between two 8" cake tins rather than 24 muffin cases..baked cooler for longer. And oh my is it ever lovely! Previous incarnations have involved a covering of chocolate fudge icing and then surrounded in a fence of chocolate fingers...two packs are exactly the right amount if you are interested, so don't do what I did and munch two thinking it won't matter...yes, yes it will. but then all it means is you have more chocolate fingers in the house, and I for one can not see how this is a bad thing.
Recipe
Ingredients
2 cups plain flour
1 tsp baking powder
1 cup (226g) butter, softened
1 cup granulated sugar
1 cup packed soft light brown sugar
4 large eggs, room temp...mine never are and as yet I see no difference...
6oz melted and cooled dark chocolate
1 cup buttermilk..if you can not get buttermilk, just add a tbsp lemon juice to milk and sit for 5 mins..this is waaaaay cheaper then buying actual buttermilk so I just do this anyway
1 tsp vanillla extract
Method
1. Preheat oven to 176C/350F if making muffins, if making the cake then turn it down a jot to about 165/170C, depending on how hot your oven cooks, mine is insane so I put mine lower
2. Line either two 12-cup muffin tins or 2 8" cake tins and set aside
3. Put your chocolate on to melt, in a bowl over simmering water
4. In a large bowl beat the butter until smooth for a few minutes, then add the sugars and beat for about 3 minutes until light and fluffy
5. Add the eggs one at a time, beat each in until well incorporated before adding the next. Your chocolate should be ok to remove form the heat now and leave to chill.
6. Add the cooled chocolate, mixing until well incorporated
7. Add the dry ingredients in three parts, alternating with the buttermilk and vanilla. With each addition ensure it is fully incorporated but do not overbeat.
8. Scrape down the bowl with a rubber spatula...I recently bought a silicone one, they are awesome! Make sure all ingredients are blended and the butter is smooth.
9. Spoon into the muffin cases or divide into the cake tins..if making a cake then drop the tins a few times to make sure there is not too much air in the batter or you will have a magic vanishing cake that is all top and no middle
10. Bake the muffins for 20-25 mins and the cake for 30-40 mins, or until a skewer, when inserted, comes out clean
11. Remove from the oven and cool in the tins for 15 minutes before turning out onto a coolin rack to cool completely
Icing - if making muffins you can ice with either vanilla buttercream or chocolate buttercream. As this is chocolatey chocolate chocolate cake I am icing with chocolate ganache, just for that extra chocolate that it may be lacking in.
Chocolate Ganache, as used for filling the chocolate macaroons:
180ml double cream
300g plain chocolate
90g unsalted butter
Heat all the ingredients in a pan until the chocolate is just melted, remove from the heat and whisk until thick. Spread joyously over the cake to sandwich together and cover...any left over ganache you can the roll into balls to make truffles, which can then be used to decorate said cake!

Wednesday 17 September 2008

pineapple upside-down cupcakes

a more portable version of this splendid cake...upside-down cake, ha! brilliant. not ever having made the larger version I was in unchartered territory, but from the reactions of my trusty tasters it was pineapple perfection!
This recipe makes 12 cakes, didn't want to make a enormous batch of duds, but you can double up to get a nice wholesome amount...
ingredients
topping:
3 tins pineapple rings in juice NOT syrup - this should give you more than enough rings to play with
1/2 cup (4oz) butter
1/2 cup soft light brown sugar
batter:
1/2 cup sugar
1/2 cup (4oz) butter
2 cups plain flour - sifted
2 eggs
1 cup pineapple juice
3tsp baking powder
2tsp vanilla extract
method
1. Preheat oven to 180C/350F
2. Grease a 12cup muffin tin lightly, with oil (I just use a pastry brush to coat the cups)
3. Open your pineapple tins and drain the juice into a jug, you need a cups worth of this so don't forget and drink it all like I did then have to go and get some more!
4. Cut 1/3 out of the pineapple rings so that they sit into the bottom of the muffin tins and reform a mini ring...you may need to experiment to get this just right! Repeat to fill all the cups
5. In a small saucepan melt the butter and sugar over a low heat, cook for 5 minutes and stir to combine whilst it thickens
6. Pour the syrup over the pineapple rings, I used a dessert spoon which was enough to just cover the fruit in the muffin tin, which is what you want. Set this to one side
7. Beat together the butter and sugar until fluffy, add the egg and vanilla, beating again until well incorporated
8. Add the baking soda, and then add the flour alternating with the pineapple juice, letting each addition mix in well before adding the next
9. Pour the batter over the fruit in the muffin tin, filling the cups 3/4 full
10. Bake for 20 minutes in the centre of the oven
11. Remove and cool in the pan for 20 minutes on a rack
12. Invert onto a baking rack or chopping board that is larger than the muffin tin...if you use a rack pop some kitchen towel under to catch any drips
...These can be served fresh from the oven with ice cream, or cold just as they are

chocolate fudge cake

a moist and immensely chocobountilful wonder cake, especially with the icing slathered all over it and in its middle...mmmmhmmm!
of course, it is another delight from Nigella, and is always saved for special purposes. I once made one with increased volumes for a friends birthday that was pretty much a behemoth of a cake, it lasted quite a while...the present that keeps on giving
ingredients
400g plain flour
250g golden caster sugar
100g light muscovado sugar
50g cocoa powder
2tsp baking powder
1tsp bicarbonate of soda
1/2 tsp salt
3 eggs
142ml/one small tub of sour cream......though asda seem to have rounded up to 150ml just to torment me yet further, damn them
1tbsp vanilla extract
175g unsalted butter, melted and cooled
125ml corn oil - I substitute for sunflower oil and all is well
300ml chilled water
method
1. Preheat the oven to 180C/350F
2. Grease and line two 20cm springform cake tins
3. In a large bowl sift the flour and mix in the sugars, cocoa, baking powder, bicarbonate of soda and the salt
4. In a smaller bowl or wide measuring jug whisk together the eggs, sour cream and vanilla
5. Using a cake mixer, freestanding or handheld...or kitchenaid...beat together the melted butter and the oil until just blended, then add the water and beat in
6. Add the dry ingredients all at once and mix (on a low speed to prevent a flour cloud)
7. Add the egg mixture and beat to combine, scrap down the bowl to make sure all in Incorporated
8. Pour into the prepared cake tins and bake in the centre of the oven for 50minutes, or until a knife comes out clean when inserted
9. Cool the cakes in their tins on a wire rack for 15minutes, then turn out to cool completely
fudge icing
175g dark chocolate (min 70%)
250g unsalted butter, softened
275g icing sugar
1tbsp vanilla extract
1. Melt the chocolate in a bowl over a pan of simmering water, leave to cool slightly
2. Cream the butter with your cake mixer, then sift in the icing sugar and beat to combine on a low speed
3. Add the vanilla and cooler chocolate, beat in thoroughly
4. Spread just over 1/3 onto the bottom cake layer and sandwich the top layer on, brush off any crumbs then spread the rest over the top and sides of the cake - this will give you a pretty thick covering...hurrah!

Wednesday 10 September 2008

chocolate macaroons

making cheesecake and creme patissiere means lots of left over egg whites, and what better way to use these up than with the little delights that are chocolate macaroons? exactly.
this recipe makes about 100 rounds, so 50 macaroons if you do small blobs (about 3cm across) or you can make bigger rounds (about 5cm across).
Ingredients
500g icing sugar
250g ground almonds
50g cocoa
50g caster sugar
8 large egg whites
Filling
180ml double cream
300g dark chocolate (70% minimum)
90g unsalted butter
Method
1. Preheat the oven to 180C, with the shelves in the middle
2. Line baking trays with baking paper; I only have two trays so I just cut out lots of sheets so I could pipe out the mixture all at once and then just swap the sheets over once one batch was cooked
3. Into a large bowl sift the icing sugar and cocoa powder, then add the ground almonds
4. Using a food mixer whisk the egg whites until half-stiff, then gradually add the caster sugar, continuing to whisk until the egg whites are stiff, but not dry (do the old 'if I turn the bowl upside down over my head does it fall on me' trick...)
5. Gradually add the dry mixture, gently folding it into the whites until just combined
6. Fit an icing bag with a 1cm piping nozzle, twist and peg the end and prop up in a pint glass
7. Spoon some mixture into the piping bag, enough to be getting along with but not so much that it sqoodges over the top when you try to grasp it...that's just wasteful
8. Pipe your rounds onto the baking paper - you could draw circles out first if you are not 100% confident. To get smooth tops I hold the nozzle to the paper at an angle, which makes the mixture smoodge together in a nice smooth topped round
9. Leave the rounds to stand for 20 minutes; this lets them form a skin on the top which makes them crunchy on top and chewy underneath - just right
10. Bake for 12-14 minutes, until dry on top but chewy underneath
11. Remove from the baking sheets to cooling racks, do this as soon as possible or they may stick a bit too much to the paper
12. Whilst cooking/cooling the macaroons make your filling of chocolate ganache buy heating all ingredients in a pan on a low heat; remove when the chocolate is just melted and whisk to thicken. Leave this to cool - it will become much thicker once cooled don't worry
13. When all is cool, pair up similar sized rounds and sandwich them together with the chocolate ganache
14. Eat them.

inside-out carrot cake cookies

mmmmhmmm! carrot cake is awesome, cookies are awesome...the
genius that thought of combining the two should be given a giant medal made of cake.
These are exceedingly nice, if I made them again I think I might use dark muscavado sugar rather than light, just to get a deeper colour but here is the recipe I used this time (I doubled the amounts as the below only makes 15 whole cookies)
Ingredients
1 1/8 cups all-purpose flour 1 teaspoon cinnamon 1/2 teaspoon baking soda 1/2 teaspoon salt 1 stick (1/2 cup) unsalted butter, softened 1/3 cup plus 2 tablespoons packed light brown sugar 1/3 cup plus 2 tablespoons granulated sugar 1 large egg 1/2 teaspoon vanilla 1 cup coarsely grated carrots (2 medium) 1 scant cup walnuts (3 oz), chopped 1/2 cup raisins (2 1/2 oz)
Filling
8oz cream cheese
icing sugar
lemon juice
Method
1. Put oven racks in upper and lower thirds of oven and preheat oven to 180C. Line two baking sheets with greaseproof paper
2. Whisk together flour, cinnamon, baking soda, and salt in a bowl
3. Beat together butter, sugars, egg, and vanilla in a bowl with an electric mixer at medium speed until pale and fluffy, about 2 minutes
4. Mix in carrots, nuts, and raisins at low speed, then add flour mixture and beat until just combined
5. Drop 1/2 dessert spoon of batter per cookie, 2 inches apart, on baking sheets and bake. Switching position of th sheets halfway through baking, until cookies are lightly browned and springy to the touch, 10 - 12 minutes total
6. Cool cookies on sheets on racks 1 minute, then transfer cookies to racks to cool completely
7. While cookies are baking, blend cream cheese with sieved icing sugar and lemon juice until you get the sweetness you like, chill this in the fridge
8. Once cool sandwich flat sides of cookies together with a generous tablespoon of cream cheese filling

london cheesecake

A request from a friend at work, for her last day, and I was more than happy to oblige. This cheesecake is from Nigella Lawson and is incredibly simple and delicious.
I was mystified for years about the infamous 'Bain-Marie', it sounded so exotic and like something I could never own...so of course felt rather a plum when I realised it is just a water bath...D'oh.
I make a larger version of this cake using a 24" springform pan and the recipe below shows the volumes for this.
Ingredients
For the base...
200g digestive biscuits or ginger nuts
100g unsalted butter - melted
For the filling...
800g cream cheese (I use light just to make you feel a bit better!)
200g caster sugar
4 large eggs
4 large egg yolks
2 tbsp vanilla extract
2 tbsp fresh lemon juice
For the topping...
200ml sour cream
1 1/2 tbsp caster sugar
3/4 tsp vanilla extract
Method
1. Process the biscuits until they are fine crumbs; if you don't have a food processor pop them in a bag, cover with a tea towel and bash to bits with a rolling pin.
2. Melt the butter and stir this into the crumbed biscuits, press this into the bottom of the springform pan using your hands (I do not line mine, but do so if you are worried about sticking); pop this in the fridge to chill
3. Preheat the oven to 180C
4. Beat the cream cheese in a food mixer until smooth, then add the sugar. Beat in the eggs and egg yolks, then the vanilla and lemon juice. Scrape round the bowl with a spatula at regular intervals to make sure all the cream cheese is mixing with the rest of the ingredients
5. Put a full kettle on to boil
6. Take the chilled tin from the fridge and double wrap the bottom and sides in strong tin foil in two large pieces
7. Place the tin in a roasting dish, and pour in the lemon filling mix
8. Pour the boiling water into the roasting tin so that it comes half way up the sides of the cake tin
9. Most incredibly carefully place this into the middle of the oven and cook for 50 minutes
10. After 50 minutes it should feel set, but not completely, just enough to pour the topping over. Whisk together the sour cream, vanilla and sugar and pour over the cheesecake - return to the oven for 10 minutes
11. Remove the roasting tin from the oven, and super carefully remove the springform tin. Unwrap it and leave on a cooling rack to cool, I place an old tea towel underneath to catch any drips of melted goo that might eek out. When cooled completely place in the fridge, remove 20 minutes before unmoulding and serving and heat a knife with boiling water to cut.
I added halved strawberries to the top of mine, and then made a coulis with the rest of the punnet for pouring over the slices...

Sunday 7 September 2008

boston cream pie & coconut cream pie cupcakes

There is nothing quite like a cupcake, unless it is a cupcake filled with creme patissiere! and then what is that creme patissiere is flavoured with Malibu! oh yes.
I love making these simply to see the look on peoples faces when they bite into them and discover the wonders contained within...
I used the vanilla cupcake recipe from Magnolia as they are denser and more disposed for filling.
Recipe
1 1/2 cups self raising flour
1 1/4 cups plain flour
229g / 1 cup unsalted butter
2 cups caster sugar
4 large eggs
1 cup milk
1 tsp vanilla extract
Method
1. Preheat oven to 176C/350F
2. Line two 12-cup muffin tins with baking cases
3. In a small bowl sift the flours together and set aside
4. Cream the butter until smooth with an electric mixer, on medium
5. Gradually add the sugar and beat until fluffy, for about 3 minutes
6. Add the eggs, one at a time, beating well after each addition until well incorporated
7. Add the dry ingredients in three parts, alternating with the milk & vanilla extract. Beat well after each addition until all mixed in
8. After making sure the batter is all completely mixed together, spoon the mixture into the cupcake cases. Fill each case about 3/4's full.
9. Bake the cakes for 20-25 minutes, until well risen and slightly golden
Filling of Creme Patissiere from Nigella Lawson
Ingerdients
125ml milk (I use skimmed and it is fine)
125ml dbl cream
1 tsp vanilla extract
3 large egg yolks
50g caster sugar
15g plain flour
..Malibu...
Method
1. Warm the milk and cream in a saucepan, bring to the boil
2. In a large bowl, whisk the yolks and sugar until creamy, then beat in the flour
3. Add the milk to the egg mixture and whisk together, then pour back into the saucepan and return to the heat - whisk constantly over a low until the custard has thickened
4. Pour the custard into a shallow dish cover with dampened greaseproof paper (to prevent a skin forming) and leave to cool
5.....I then split the custard into two and mixed vanilla extract into one batch and enough Malibu to taste into the other.
Icings
I used a basic chocolate butter cream for the boston cream pie and a coconut icing for the Malibu ones...
Chocolate Butter Cream: 75g soft unsalted butter, 100g icing sugar and 50g cocoa blended together with a little double cream to make it all nice and smooth.
Coconut Icing: 25g unsweetend dessicated coconut, 75g soft unsalted butter, 150g icing sugar and 1 tablespoon Malibu. Toast the coconut in a dry frying pan until fragrant and golden, leave to cool. Blend the butter and icing sugar, then beat in the Malibu and cooled coconut.
Constructing the cupcakes
1. Using a sharp knife cut cones out of the tops of the cupcakes, slice the bottom off the cones so that you are left with a little cakey lid. Eat the cut off bit.
2. Using a teaspoon fill the hole you have made with one of the flavoured creme patissiere, then replace the lid
3. Carefully smooth on the icing that matches the filling, I used a knife rather than piping or you get too much and these are rather a rich cake as it is
4. Pop the cupcakes into the fridge to cool and set the filling a bit, I kept mine in the fridge until about 20mins before giving the out at work so that they didn't splurge everywhere when bitten into!